
The Payment Details menu allows you to manage how payment processing and invoice works for you in Zencare Practice management. There are two tabs at the top of the screen, Basics and Stripe.
Basics
Billing & Payment Preferences
You can set preferences on how to invoice and process payments here. Under Invoice Creation you can select ether to Manually Invoice or Auto Invoice from the drop down menu.
Auto invoice links the generation of an invoice to marking attendance. When Auto Invoice is enabled and you mark attendance for a session, Zencare Practice Management automatically creates the invoice but does not send them to the client. Since attendance is marked on a session by session basis, Auto-Invoicing always creates one invoice per session.
Under Payments you can select whether to Payments will Process Manually or Process Immediately or Process Nightly from the drop down menu.
Nightly charges enrolled clients any invoiced and unpaid balances between 12:00am-2:00am (eastern time) each day.
Under Invoice Sending you can select ether Send Manually or Send Automatically from the dropdown menu.
When an invoice is generated for a client, you have the option to skip the PDF preview and automatically e-mail the invoice to the client or payer. Not recommended if you use split charges or invoice customizations like: password protect, show next appointment, hide client info, etc.
Under Receipt Sending you can select ether Send Manually or Send Automatically.
When a receipt is generated for a client, you have the option to skip the PDF preview and automatically e-mail the receipt to the client or payer.
Bulk Update Client Settings
You can make changes to that affect all clients regarding Autopay, Invoices, and Receipts from the Bulk Update Client Settings. When modifying Autopay settings, you can review your client information by selecting Review Clients.
Accepted Payment Methods
From here you can toggle the forms of payments that your practice uses. If toggled "off," you will not see them as options when you Record Payments.
3rd Party Payers
You can manually enter 3rd party payers by selecting Edit Payers. Simply enter the desired Payer Label in the Add 3rd Party Payer menu and then select Save when finished. You can delete payers by selecting the trashcan icon.
Tax Settings
To enable tax services, select the Enable Taxes checkbox under Tax Settings. Next, enter your Tax ID number and select whether it is your SSN or EIN. You can also create a custom Tax Message that will appear on invoices and receipts.
Invoice, Receipt, Refund and Insurance Messages
Here, you can customize your:
- Invoice Footer
- Default Email Message
- Default Account Summary Message
- Account Summary Footer
- Receipt Footer
- Default Receipt Email Message
- Refund Footer
- Default Refund Email Message
- Default EOB Email Message
- Default Superbill Email message
- Default CMS 1500 Email Message
These footers will be included at the bottom of all future invoices, receipts, refunds and account summaries.
When Zencare sends invoices, receipts, or account summaries to your clients they are sent as PDF attachments. Use these fields to customize what the body of those messages should say.
Stripe
This is where you can integrate Zencare Practice Management with Stripe.
What information and documents do I need to sign up for Stripe Payments?
To sign up for an account and begin processing payments via Stripe we require some information about you and your business. Be sure you have the following information readily available before you start in order to expedite your application:
- Mobile phone number (to receive verification texts)
- Business Name
- Business Address
- Practice Owner's Name, Address, & Date of Birth
- Bank Account Information including Transit, Institution and Account Number
Common follow-up requirements include photo identification documents and address verification.
How do I sign up for the Stripe Integration?
Login to your Zencare Practice Management account and go to Settings, then Payment Details and select the Stripe tab at the top of the screen.
Then, select the Connect with Stripe button. This button is only visible to Practice Owners or Administrators. Therapists do not have the user permissions needed to setup or disable the Stripe connection. Selecting this button will redirect you to the Stripe merchant application page within your current browser tab. On this page, you will need to enter your phone number (mobile) and e-mail address:
Enter the verification code that was sent via text message to the phone number you entered. You can resend the code if you're having difficulties You will be redirected to Stripe within the same tab. Next, enter the information that best describes your business type in the fields provided. *Note: Your progress will be saved automatically on each page, enabling you to return to the application at a later time if needed*
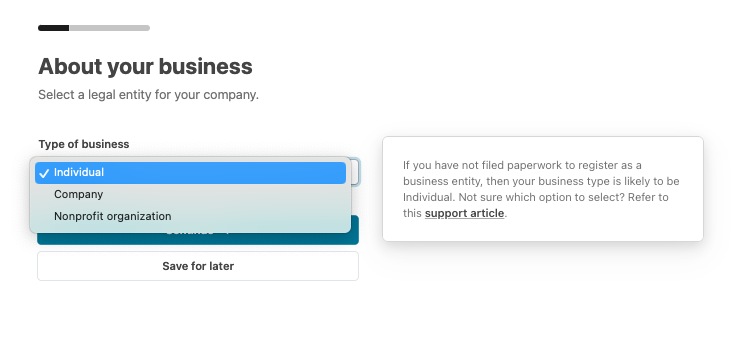
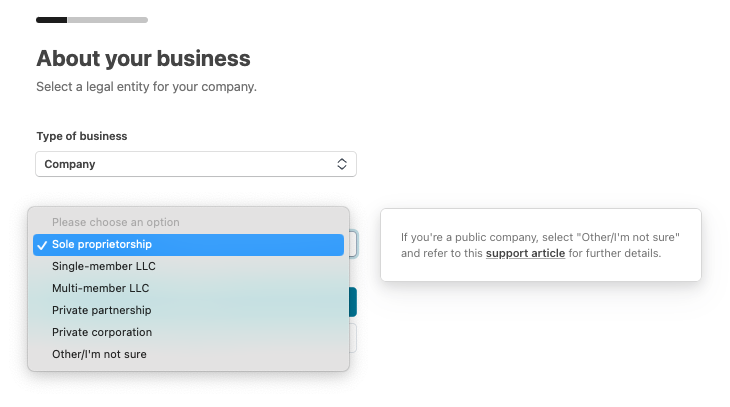
You will be asked to Select your Type of Business and business structure, then provide more information about your business such as name and EIN
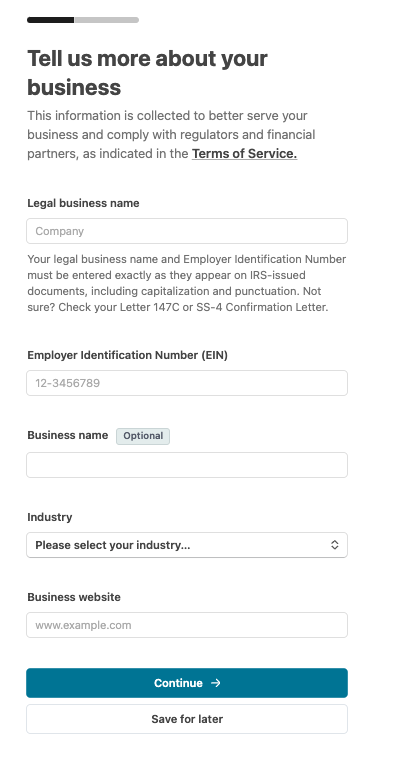
Note About Statement Descriptors
A statement descriptor is what will be shown on your client's bank account or credit card statements when you charge them through Stripe. What you input into the "Legal business name" field will be the statement descriptor for your transactions should you choose to leave the "Business Name" (optional) field blank. If your Legal business name is lengthy or might not be recognizable to your clients on their statements, you can use the "Business Name" field to create a more pointed and specific statement descriptor. Alternatively, you can set a statement descriptor in Zencare Practice Management under Payment Details in Settings.
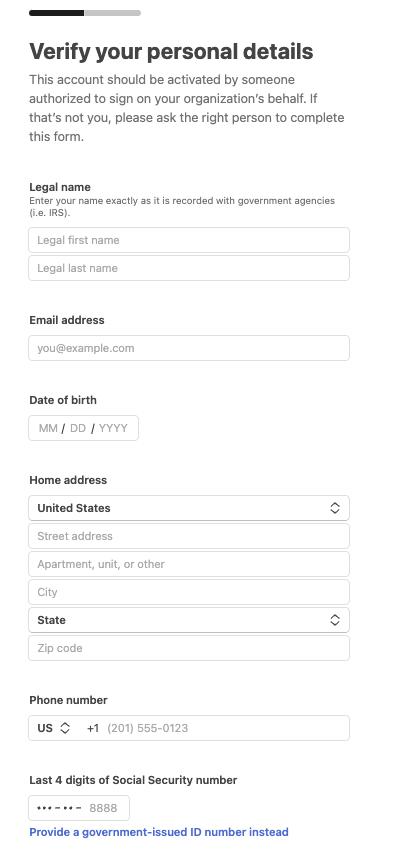
You will be asked to provide the details of the business Owner or Administrator who will be managing the Stripe account and overseeing the payments and/or reconciliation process for the practice.
Next, you will need to enter the bank account details for the bank account where your payouts from Stripe will be deposited.
Finally, you will be shown a summary of the information you've entered. Review it to confirm everything is correct and then select the Agree & Submit button.
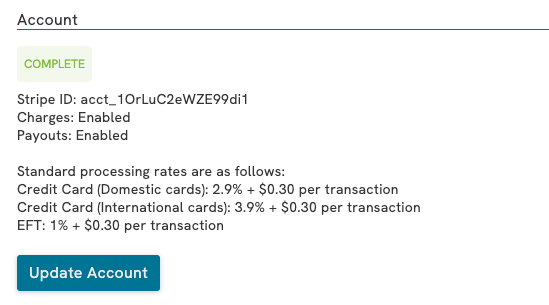
For most applications, the account approval process is nearly instantaneous and you will be able to add client payment methods and accept payments right away in Zencare. When you navigate back to your Zencare account and go into Payment Details you will see that your Zencare account is now connected with Stripe and enabled for payment processing.
Why was my account not approved?
As mentioned, most applications are approved instantaneously but there are times when an application will not be approved immediately. In this case, the account status will be Restricted while underwriting and adjudication occurs to validate your application. The most common reason for a Stripe connected account being put on Restricted status is an incomplete application. Be sure to check that you've completed all required fields and have uploaded verifying documentation (e.g. photo identification like driver's license or address verifying documents like office utility bill) to support your application. If we need more information about your business or additional verification, a member of our Customer Advocacy team will reach out to you to request further information.
What do I do if I have issues signing up for Zencare's Stripe Integration?
If you encounter any issues during the setup process or have any questions about using Zencare Integrated Payments by Stripe, please don't hesitate to contact our Customer Advocacy team.
Comments
Please sign in to leave a comment.