Customizing Your View Options
You can use the bar at the top of your Calendar to control how you view your Calendar.
On the right-hand side of the Calendar View Bar, you have the option to switch between Day, Week and Month views for the Calendar. If you have Rooms set up in Zencare Practice Management, you can also switch to a Room View by selecting Rooms. Selecting the Clock Icon will take you to an Availability View for the Calendar.
Selecting the Settings button in this area, represented by the cog icon, will allow you to configure a few different aspects of the Calendar.
The Hidden Days area will allow you to hide certain days on the Calendar from view.
Note: That doing this alone will not prevent you or others from booking sessions on those days.
You can also configure Calendar Intervals, which will determine how much time each 'block' in the Calendar takes up. This could be helpful for instance if you always hold very long sessions and wanted to be able to see more in the Calendar at a time. Finally, you can configure your Calendar Start Time, which will decide what time will be at the top of the Calendar when you open up Zencare Practice Management.
On the left-hand side of the Calendar View Bar, you have a few more options. You can select Today to jump straight to the current day in the Calendar, select the Refresh icon to refresh the Calendar, Sync your Calendar to a third-party calendar such as Google Calendar, and Export the Calendar as a PDF or CSV file.
Creating a Session
To create a session, simply select an empty space on the Calendar View. This will open the Create Session menu. From here, select the Client under Event Type, enter the Client's Name, Therapist, and Supervisor. If the client already has a therapist assigned to them, then the Therapist and Supervisor fields will auto-populate with that information. Next, select the appropriate Service from the drop down menu, as well as the Location of the Service. You can mark whether or not the client as attended the session already under Attendance, and enter relevant information such as the Fee for the Service. You can enter any relevant payment information under the Payment section. Once you are finished, select Create Session in the bottom right.
Marking Attendance for Sessions
After a session is complete, you must mark attendance for the session, which also acts as the first step in creating an invoice for payment.
There are five attendance types in Zencare Practice Management. These appear from left to right when selecting a session in the Calendar View:
- Attended - this means the client attended the session.
- Cancelled - if a client cancelled a session within the range of your cancellation policy, use this status to record the cancellation but not bill for it. This status can also be triggered if a client cancels from the Client Portal.
- Late Cancelled - if a client cancels at the last minute, it may require additional charges or otherwise be recorded. This will generate an invoice. This status can also be triggered if a client cancels from the Client Portal.
- No Show - for the unfortunate situation where a client does not cancel and does not attend a session.
- Non-Billable - these sessions are attended, but for some reason are not counted towards an invoice or balance.
These statuses will also appear on the session it is designated for in the Calendar View.
There are three ways to mark attendance:
From the Calendar View:
- Open the Session Overview Window by selecting a session and then select the appropriate attendance icon.
- Or by selecting a session and selecting More Info and selecting the status from the Attendance drop down menu.
From the Clients View:
- After selecting the client from the Clients View, head to Sessions & Notes and select the checkbox next to the session you are marking attendance for, opening the green edit bar. Select Mark Attendance and choose the appropriate attendance option.
From the Workflow:
- Head to the Workflow and then Attendance under Billing. Then select the checkbox next to the session you are marking attendance for, opening the green edit bar and select Mark Attendance and choose the appropriate attendance option.
When recording attendance from the Client Account or the Workflow views, you can record attendance for up to 3 sessions at a time by simply holding the Shift key when selecting the checkbox next to the sessions you are marking as attended. When you select Mark Attendance, the attendance status you choose will apply to all the Sessions you have selected.
Scheduling and Managing Recurring Sessions
Scheduling Recurring Sessions
In some cases, you may have regularly-scheduled appointments with a single client, and you'll need to make sure that their appointments are always available in your calendar. To do this, open the Create Session Window as you would any other session. Enter the Client Name and Service as you would any other session.
Select the Recurrence drop down to select the type of recurrence.
There are four options:
- None: this session does not recur (automatic if you do not change it).
- Weekly: occurs on the same day every week.
- Bi-Weekly: the session appears on the same day every two weeks
- Every 3 Weeks
- Every 4 Weeks.
Once you've selected how often it recurs, now you'll need to choose how long this recurrence continues.
You can set the limit to the recurrence one of two ways:
- After: this means that it will continue to appear for however many times (4 sessions, for instance). Afterwards, they will stop being automatically added to your calendar.
- On a Date: You can set the future end date of the sessions with this client.
For both of the above settings, recurrences can only be set to go up to one year into the future. Once saved, this session will continue to recur. You will still have to Mark Attendance to invoice for each session separately.
Viewing Recurring Sessions
Under the Session & Notes section under Client Accounts, you will see the next three sessions in each recurrence. This means if you have four different types of recurring sessions for this client, you may see twelve upcoming sessions on the Client Account. You can clear this filter by selecting the X next to the Next 3 Recurrences label to see all upcoming sessions for that client.
Editing and Deleting Recurring Sessions
You can edit a session that recurs just like you do any regular session. Simply select the session in the Calendar to open the Session View window, and then press the More Info text at the bottom of this window. This will open up the Edit Session window.
Note: You cannot Edit Sessions if a client has already been invoiced. Any invoice or receipt associated with the session needs to be deleted first before you can edit a session.
Unique to recurring sessions is the option to apply the changes only to that specific session, or to apply it to both the session and all future recurrences of that session from the date of the session you edited.
The same goes for deleting the session - when you select the Delete in the Edit Session window, you will be presented with the option to either only delete that specific session, or to delete that session and all future recurrences of it.
Using Privacy Mode to Schedule Sessions
If you need to schedule a session while a client or someone else is in the room, Zencare has a Privacy Mode that will hide your client's names on the Calendar.
Note: While Privacy Mode will hide client names on the Calendar and the Client Account, it will not prevent the full name appearing when you schedule a session, and it will not hide names if you open an invoice, receipt, or account summary.
To toggle Privacy Mode, Select the eye icon from anywhere in Zencare in the top bar. Select the icon again to disable Privacy Mode.
Managing Multiple Locations in the Calendar View
It is possible to sync the Calendar View and filter by location in Zencare. First, make sure you have your practice locations configured properly. You can find out more about configuring locations in the Configuring Locations and Rooms article.
In the Calendar View, on the top of the screen there is a drop down menu that allows you to select an individual location. This allows you to configure your view to display only appointments assigned to this individual location.
Next, you can select multiple practice locations to sync your view under the Locations section on the left hand side. The locations that have been selected will be the only ones populated in the Calendar View.
You can also change the location of a session within the Create Session view by selecting the practice location under Location.
Note: The Location drop down menu defaults to the location selected at the top of the calendar display.
How Can I View Important Client Details Directly From the Calendar?
Zencare Practice Management offers a Priority Comment area for your clients that can be seen right from the Calendar. It allows you to add an important comment on a client-by-client basis that you can see from the Session Overview Window in every session. You can use it to set alerts on sessions such as "Do not leave messages on their home phone" or "Client's mother only speaks French, send her invoices in French" that are readily noticeable to everyone at your practice.
To add a high priority comment:
- Select the client in the Clients View
- Select Contact & Clinical, and then the Clinical Details
- Select the Edit button at the bottom of the screen
- Add your comments into the Priority Comments section
- Select the Save button
Once a priority comment has been saved to a client's profile you will see the Priority Comment icon on any sessions you book for them in the Calendar.
Sync Your Calendar with a Third Party Program
You can share an anonymous, HIPAA-compliant feed of your schedule to an external, third-party calendar like Google Calendar, Apple Calendar or many other applications you use on your phone or computer. This is a one-way synchronization, meaning Zencare will send session times to whatever software you wish.
To be HIPAA compliant, synchronization can only happen from Zencare to a third party, as we cannot give a third party access to your Zencare account (as would be needed for a two way sync).
You can do so with two different methods:
Sync with Google Calendar
If you use Google Calendar, or an Android device with the default Google Calendar app, from your desktop or mobile phone, select the Sync button on the Calendar screen. Select Synchronize with Google Calendar.
When you are ready, select Authenticate.
This will take you to a Google login screen. Enter in your Google credentials and select the Allow button on the next screen.
Sync with all Other Third Party Calendars
For all other scheduling software (such as Apple, Outlook, etc.), you will need to subscribe to a feed or an ICS file. To start, let's grab the ICS address from Zencare Practice Management:
Select the Sync button in the Calendar view.
This will show you your calendar sync URL - select and copy the link.
Now, you will want to subscribe to this link on your calendar. We're using an Apple Calendar as an example, but the process is similar on other software.
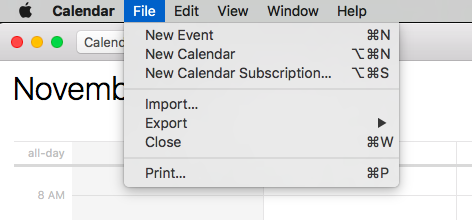
Select File, then New Calendar.
Paste the URL into the Calendar URL box that appears.
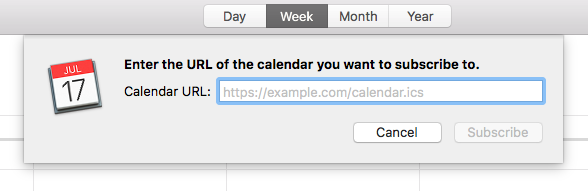
Select Subscribe.
Finally, you will be given the option to customize a few details about the calendar. Make sure auto-refresh is set to every 5 minutes, otherwise the calendar may not sync properly. When finished, select OK.
Frequently Asked Questions about Calendar Sync
A: No, not at this time. The shareable calendar is designed to be as anonymous as possible to keep compliant with HIPAA regulations. You'll notice that you only see the client's three-letter Client Code on your calendar, not their name.